
🦈 Looking under the hood of secure connections in Wireshark. Part 3.1: MITM attack on SSL/TLS connections
More in General
- We helped Apple fix a vulnerability in the kernel of its operating systems
We helped Apple fix a vulnerability in the kernel of its operating systems PT ESC expert…
- Recovering EVTX records: carving methods
Recovering EVTX records: carving methods 🧩 When investigating incidents where attackers encrypt virtual machine images, a…
- Operation Chewbacca
At the end of June, the PT ESC team, during incident investigations, discovered a new group…
- Your Zimbra server is at risk
Recently, our PT ESC IR team encountered a new attack by ransomware groups on Zimbra mail…
- He's not your gsocket
He's not gsocket to you 😑 During the investigation of one of the incidents, PT ESC…




In addition to the previous post we are looking at additional tools for decrypting network traffic.
Let’s look at an alternative to PolarProxy that is not proprietary. SSLproxy is a tool that is essentially a continuation of sslsplit, but has a number of other advantages, in particular — writing decrypted data to a PCAP file. This project is used in UTMFW. First, let’s configure the host as in the case of sslsplit, except here traffic will be redirected to a single port 8443.
sslproxy -k ca.key -c ca.crt -P https 0.0.0.0 8443 -X sslproxy.pcapCode language: plaintext (plaintext)Let’s form a request specifying the pre-generated certificate in the --cacert option.
curl --cacert ca.crt --tlsv1.3 https://ptsecurity.com/Code language: Bash (bash)Unlike the previously described tools, here a PCAP file with decrypted data is generated, so it can be parsed using Zeek, Suricata and other DPI. But the tool has a drawback similar to sslsplit — the file with master keys is generated incorrectly for TLSv1.3.
To sum up on the PolarProxy and SSLProxy tools: they are excellent analogues of sslsplit, which can also be used in one or another automated service, for example in an application analysis system or NGFW.
All the tools mentioned above have one key drawback — they do not have the ability to generate, or fully generate, a file with master keys of SSL/TLS sessions. Let’s look at a tool that solves specifically this problem.
❕ mitmproxy — an interactive open-source tool. It has the ability to use a web UI (mitmweb). Unlike the previous analogues, this tool does not have the ability to write decrypted data to a PCAP file, but it is capable of working with master keys most effectively. This tool is contained in many repositories, including PyPI.
To capture network traffic in real time using mitmproxy, you can use the following command:
SSLKEYLOGFILE="$PWD/.mitmproxy/sslkeylogfile.txt" mitmproxy --set confdir=.mitmproxy/ --listen-host 0.0.0.0 -p 8080Code language: Bash (bash)In the working directory where mitmproxy was launched, a directory with configuration files .mitmproxy will be created, which will contain these certificates. Subsequently, they can be used when implementing a MITM attack on SSL/TLS.
Let’s try to make an HTTP/2 request through the running proxy, while specifying the CA (certificate authority).
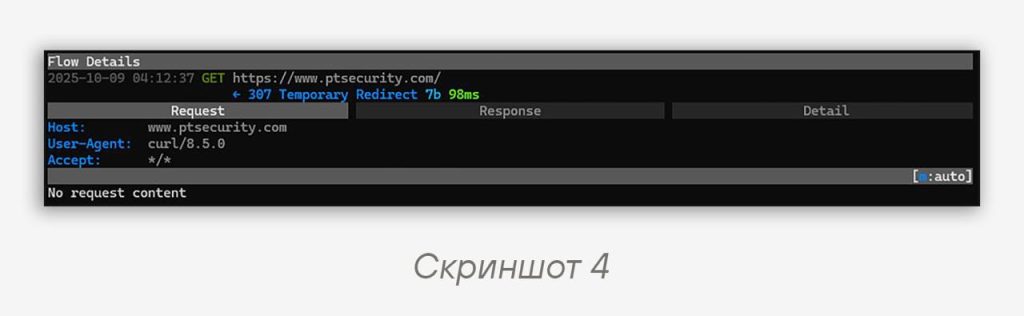
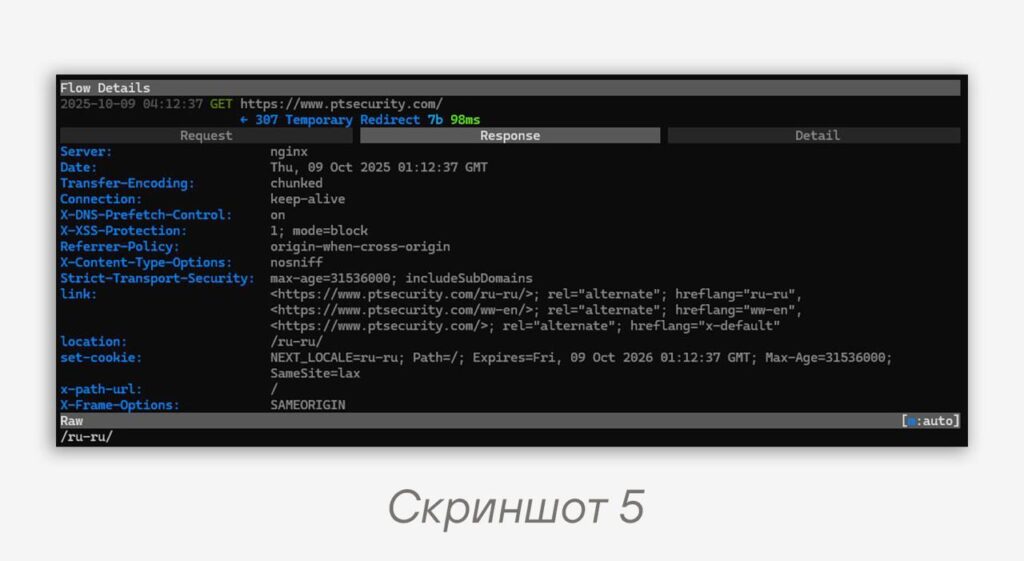
curl --proxy 127.0.0.1:8080 --cacert ~/.mitmproxy/mitmproxy-ca-cert.pem https://www.ptsecurity.com/Code language: Bash (bash)Since the data arrives in decrypted form, we can interactively observe the request headers (screenshot 4) and response headers (screenshot 5). The obtained keys sslkeylogfile.txt, which we specified in the environment variable SSLKEYLOGFILE, we can use later for our purposes, including in Wireshark. At the same time, the keys of TLSv1.3 sessions will have the correct format, unlike the previous tools. mitmproxy also has transparent proxy functionality, if the --mode transparent option is added.
Thus, among the advantages of mitmproxy we can note the speed of deployment, interactivity (including web UI), relevance (the tool is regularly updated and improved), as well as the ability to generate working master keys for TLSv1.3.
💬 To sum up, I would like to note that there are many tools for carrying out MITM attacks on SSL/TLS connections. Each of these tools has its own pros and cons and is suitable for different tasks.
#dfir #tip #mitm #ssl #tls
@ptescalator
More from oUth0R
- We helped Apple fix a vulnerability in the kernel of its operating systems
We helped Apple fix a vulnerability in the kernel of its operating systems PT ESC expert…
- Recovering EVTX records: carving methods
Recovering EVTX records: carving methods 🧩 When investigating incidents where attackers encrypt virtual machine images, a…
- Operation Chewbacca
At the end of June, the PT ESC team, during incident investigations, discovered a new group…
- Your Zimbra server is at risk
Recently, our PT ESC IR team encountered a new attack by ransomware groups on Zimbra mail…
- He's not your gsocket
He's not gsocket to you 😑 During the investigation of one of the incidents, PT ESC…
More in General
- We helped Apple fix a vulnerability in the kernel of its operating systems
We helped Apple fix a vulnerability in the kernel of its operating systems PT ESC expert…
- Recovering EVTX records: carving methods
Recovering EVTX records: carving methods 🧩 When investigating incidents where attackers encrypt virtual machine images, a…
- Operation Chewbacca
At the end of June, the PT ESC team, during incident investigations, discovered a new group…
- Your Zimbra server is at risk
Recently, our PT ESC IR team encountered a new attack by ransomware groups on Zimbra mail…
- He's not your gsocket
He's not gsocket to you 😑 During the investigation of one of the incidents, PT ESC…